
I’m not in the habit of using my blog to share projects, but when I posted a picture on Instagram of my new photo wall, it generated some interest.
So, I’m sharing how I did it.
But first why. I am not really a photo person. I can’t explain this except that I have an inherent need to buck trends. It’s like my own weird way of expressing my individuality.
When everyone else in the world switched to digital and was ramping up their photo taking, I did the complete opposite letting mine practically grind to a halt.
It isn’t that I don’t appreciate capturing memories, it’s just that I can’t quite get behind how extreme it has all become. And overwhelmed by it all, I do nothing.
I also love blank walls and uncluttered surfaces so having a ton of framed pictures around doesn’t do it for me.
I justify my photo-free lifestyle many different ways:
I don’t have a thousands of pictures from my childhood and the ones I do have I rarely look at.
When and how are we ever going to look at all the photos we snap at every moment?
Isn’t being present in the moment, cementing the memory, a better use of our brains than cataloguing if and when we got the shot?
This is all a very long way of explaining that over the last two years I have softened a little bit in my thinking towards photos. Since I started using Instagram, I’ve been much better about capturing moments, filtering and framing them into little, square works of art. Of course, it’s a very curated selection, but it’s taken me back to what photos should be about:
Capturing a special moment, not capturing every freakin’ moment.
The main challenge was what to do with these images that I had collected that were now trapped on my phone. After my collection on Instagram grew fairly substantial, I had an idea to create a photo wall. I wanted to do something different than a gallery wall (bucking trends!).
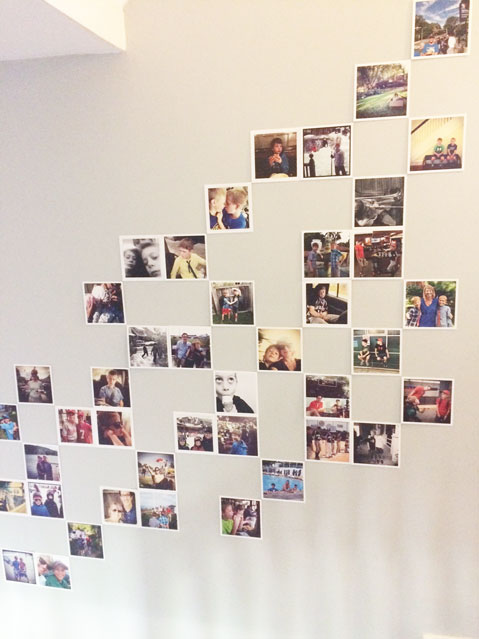
Instead, I had my Instagram pictures printed, and created a collage that in its own way is an ode to old school stairwells with family photos lining the wall.
Here’s how I made my Instagram photo wall:
1. Pick your photos.
I picked fifty images from over the last two years of our family’s day-to-day life and from special events. Our photo wall represents our life right now and will be a living and breathing thing that changes as we add photos and take others down. I tried to represent each family member equally, and I chose to keep the wall to our immediate family. But obviously you can pick whatever pictures you damn well please.
2. Have your photos printed
I used Artifact Uprising to print my photos. The prints are 5.5 X 5.5 and are on heavy off-white stock paper with a matte finish. That’s just my personal preference when it comes to aesthetic. But you could do glossy, bigger, smaller, whatever. I used a combination of color and black and white photos but again, do what you want. All black and white would be very cool. And the images don’t have to be images that you’ve uploaded to Instagram. You can connect your Instagram account or load straight from your computer. Social Print Studio is another printing option worth checking out.
3. Find and measure your space
I picked one wall of our stairwell, but any wall will do. You’ll want to measure your space in inches so that you can easily do step #4 which is to create a scale grid of your space. Remember when you’re measuring your space to think about whether you want the pictures all the way up to the edge or if you want a buffer.
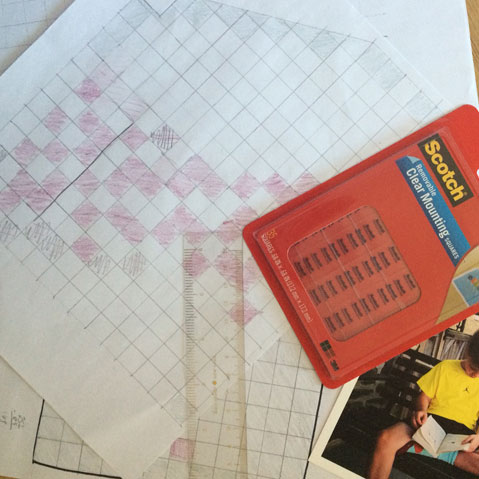
4. Create a grid & plan a pattern
I love Instagram images because they are square. This makes it easy to plan a grid using simple math. I drew to scale a wall and a grid on a regular piece of paper. I mapped out the pattern that I wanted the images to be in on my grid, coloring in the squares where photos would be. This allowed me to get a sense of how they would look and fit on the wall before I started hanging them up. Our wall had been recently painted so I didn’t spend a lot of time prepping the surface, but it probably would’t hurt to give the wall a good wipe down.
5. Measure, level, & attach
Using my grid as a guide, I measured the placement of the first square and used a level to mark on the wall where it should be mounted. To attach the images, I used Scotch Removable Clear Mounting Squares. I used two mounting squares per image placing them on the back, one toward the top and one toward the bottom. I would lightly press the picture to the wall and check once more to make sure it was level before pressing entirely agains the wall. It took me a couple of hours to hang all 50 pictures.
6. Step back and enjoy
I love how our wall turned out. I love how putting it together reminded me of Tetris, one of my favorite games. I love how the pictures are all the same size and uniform in shape and together make a graphic collage. I love how it creates a piece of art without being a huge commitment. I love that it was much less expensive and time consuming than shopping for frames and trying to make a gallery wall. I love that it will evolve as our family evolves. But most of all, I love that very time I go up and down the stairs, it makes me smile.
When Kaly doesn’t have her nose in a book, she wrangles and referees two elementary age boys and blogs about her humorous efforts to lead a mindful, connected life. She’s the author of Good Move: Strategy and Advice for Your Family’s Relocation, a book about the craziness of moving with kids. Her writing has been featured on sites such as Mamalode, The Mid, In The Powder Room, McSweeney’s Internet Tendency, and Scary Mommy to name a few. You can find her on Facebook, Instagram, Pinterest, and Twitter.
Very cool!